What a grueling climb that was. Honestly, for the most part, I didn’t enjoy that at all! I was teetering on the edge of going broke for the majority of the time, and I kept having setbacks that made me wonder if it would ever end. I wanted to go back to farming and getting my builders busy so bad. But I had come so far, I had to finish…and in a night full of boosting, gemming, non-stop raiding and shaky hands, that’s exactly what I did. I finally finished. A BIG shout-out to my clanmates who had to donate a ton and hear my whining for weeks now. ;)


Now, I know what a lot of people are thinking when they see that achievement in their profile. “Wow, 2,000 gems! That would be so sweet to have from reaching Champion!” And yes, it’s nice for sure. But the truth of the matter is, 2,000 gems doesn’t do a whole lot when you’re already close to maxed and you’re not trying to maintain a high world ranking or something. It’s pretty much insta-finishing two 7-day upgrades or something to that effect. To be honest, I spent over 2,000 gems just to do it for sure. (I can go into a whole discussion on the purpose of gems later, but the point is, pushing to Champion is NOT to profit in any way. It’s a waste of time/gems if you’re thinking from that perspective. Rather, it’s an achievement and a test of your mettle and skill.)
Along the way, I think I changed my base two or three times, trying to find the right deterrent for attackers. I finally settled on a layout that not only reduced the number of attacks I incurred, but it also won me two defenses after I made the switch! It doesn’t sound like a lot, but having defensive wins and a chunk of trophies come your way even once a day is a huge help. (By comparison, top-ranked players get a defensive win maybe once every two weeks because the attackers are so skilled up there…plus level 40 heroes are OP.)
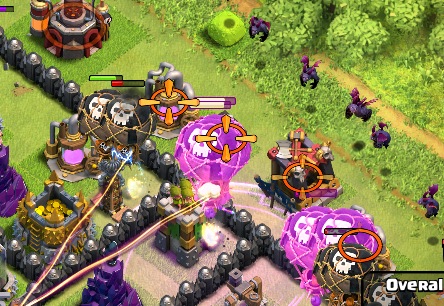
Here was my layout, which I have since tweaked slightly:
I made the base from scratch on my phone, and my aims were these:
- Wall off the Xbows and Inferno Towers so that they cannot easily be destroyed in a flurry of activity in the middle.
- Surround the Townhall with Hidden Teslas, Giant Bombs, heroes, and CC troops to further distract the attacker from getting the 2 stars.
- Have all the key walls clustered near the center so the attacker could not easily deploy wallbreakers early in the raid without risk of them getting killed before detonating.
- Make it harder for tier 1 troops to pick off the outside buildings for the 50%.
- Look a little weird so attackers are turned off by the uncertainty.
Now, of course I still suffered losses–both 1 and 2 stars–but it still gave me enough time in between raids and the occasional win to prove a success in my eyes. Nobody stops maxed out GoWiWi or GoWiPe attacks with any regularity (unless their walls are level 10+ and the attacker does not have maxed out heroes).
I started this push using my trusty balloonian army, but frankly, it just felt underpowered toward the end. Sure, I could carefully pick my bases and pluck off that 50%, but I would never get any loot to cover the costs.
I went with GoWiWi pretty much all the way, and it was partly because I didn’t have the elixir to use GoWiPe (those PEKKAs are expensive), but also because I’m more comfortable with it. PEKKAs are most unstoppable if you use them right, especially when you’re up against high level enemy heroes, but I’m not totally familiar with how to manipulate their AI yet.
My army composition cut back on the number of wizards from what I’m used to and featured 5 witches. I had a healthier stock of DE when I chose my troop ratios, and I sort of fell in love with the flood of skeles that the witches would provide. Anything to help distract the multi-targeting inferno towers were a big plus in my book.
As I raided over and over against nearly maxed out bases, here are some (sometimes painful) lessons that I learned, mostly about GoWiWi:
- When deploying the three golems, spread them out a decent amount. If they’re too close, they will just converge on the same target and overlap, making them less useful. If they’re too far apart, you won’t focus down the defenses quickly enough.
- Also, pay attention to where the nearest defensive structure is. If you deploy a golem near nothing but mines and storages, for example, it will start wandering off and not leading your wizards and witches for the attack.
- Deploy quickly and be decisive.
- Don’t place the wallbreakers right where the golem is. If the golem is banging away at a corner wall, and the wallbreaker goes there exactly, it may die from wizard tower or mortar splash. Place them a few tiles away.
- Fan out the wizards behind the golems evenly and quickly. Don’t place them too far out that the golems aren’t protecting them. Then, you’re just wasting valuable troops.
- Rage the middle golem’s group of attackers. This helps break through the center faster, and also will rage the wallbreakers you send in to punch the rest of the way. Sometimes, you need that extra speed and power.
- Save the second rage for the troops within range of the townhall.
- Plan out ahead of time where you will (probably) use the Freeze spell. This means Inferno Towers plus as many hurtful defenses as possible. If it’s a single targeting inferno, wait a few seconds longer…you don’t need to freeze it right away until it’s about to turn on the extra heat.
- Hero abilities are key. Sometimes you want to do it as the heroes are almost dead, but sometimes you want to do it earlier for a number of reasons. It’s better, for example, to use the BK’s Iron Fist ability early if it means you will quickly destroy the xbows and inferno towers and save the lives of some troops. Or, frankly, if your attention and focus is needed elsewhere, it’s better to use the ability and then divert your eyes to another part of base rather than coming back to your hero later and finding that he/she is already dead.
- If I were to do this all over again, I would save up at least 40K DE and 4M elixir ahead of time. I hated struggling with resources, and it even cost me a couple of wins as I made inferior armies just to target storages and such.
- Level 10+ walls are no joke. After a couple of failed raids, I stopped attacking these bases because my wallbreakers would often fail to punch through to the middle (and I didn’t want to add 4-6 more wallbreakers in my army).
Anyway, I could ramble on and on, but man…what a learning experience. I know the guys on YouTube make it look really easy, but I rarely found any abandoned or TH9 bases for the last couple hundred trophies. Toward the end, you need to do at least 2-3 attacks without your screen going idle to make up for the inevitable defensive losses. That means waiting at least 45 minutes if your spell factory, heroes, and maybe dark barracks are boosted…or more than three hours if they aren’t. I don’t know about you, but it was hard enough for me to touch the screen every couple of minutes for 45 minutes straight. I can’t imagine trying to do this without boosting or gemming at all.
Now that it’s done, I’m riding a 2-day shield and I boosted my elixir collectors and dark elixir drills. It’s time for me to replenish and then drop back down to Masters to resume my farming ways. :) But for now, I will enjoy the badge.


.jpg)
.jpg)